Create a Planned Run with Sample Sets
If you set up your samples in Sample Sets before you plan an instrument run, you can add one or more Sample Sets to your Planned Run.
Note that a Sample Set that uses an Ion AmpliSeq™ library preparation kit must also use the corresponding barcode kit that comes with the library preparation kit.
- In the Plan tab, click Samples.
-
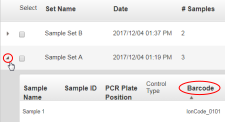
In the Sample Sets screen, select one or more Sample Sets to add to the Planned Run.
-
To plan a run using a single Sample Set, click
 (Actions) > Plan Run in the row of the Sample Set.
-
To plan a run using multiple Sample Sets, select the checkboxes next to the Sample Sets that you want to add to the Planned Run, then click Plan Run.
The Select a Run Template to apply to this experiment dialog box lists Planned Run templates that support your Sample Set.
-
-
In the Plan Run from Sample Set dialog box, select a run template to use for the experiment, then click Plan Run.
If you do not see the template that you are looking for, select Show All Templates, then look again for the template.
The Create Plan workflow opens to the Barcoding step with the Sample Sets that you selected:
-
In the Barcoding step in the workflow bar, enter or select the required information. Depending on your sequencing application, options can vary.
Option
Description
Select Default to accept default analysis parameter settings (recommended).
Advanced users can customize analysis parameters by selecting Custom, then editing appropriate analysis options. For more information, see Command Line Args (Advanced) screen.
Select the reference library file that is appropriate for your sample. Depending on your application, you may have to select separate DNA, RNA, and fusions reference library files.
Select the target regions BED file appropriate for your sample. Depending on your application, you may have to select separate DNA and fusions target regions files.
Ensure that you are using the current BED or VCF files.
Select the hotspots (BED or VCF) file appropriate for your sample.
Ensure that you are using the current BED or VCF files.
-
Select the Use same reference & BED files for all barcodes checkbox if you are using the same reference, target regions, and hotspots files across all of your barcoded samples in the Planned Run.
If you are using different reference and/or BED files for one or more of your barcoded samples, deselect the Use same reference & BED files for all barcodes checkbox.
- In Sample Tube Label, scan or enter the barcode of the Ion Chef™ sample tubes to be used in the run.
- In Chip Barcode, scan or enter the barcode that is printed on the chip that is used for this run.
-
Complete the samples table.
-
You can save the samples table to a CSV file, fill out all required sample information, and then upload the samples table to populate the Samples Table automatically.
-
Click Save Samples Table to save the CSV file to your computer.
-
Edit the CSV file by entering all required sample information into the appropriate sample information columns, then save the CSV file to your computer.
-
Click Load Samples Table, then select an appropriate CSV file containing sample information specific for this Planned Run.
-
Click Load to populate the samples table with sample information supplied by the CSV file.
-
-
Alternatively, you can manually enter sample information into the samples table. Depending on your sequencing application, options can vary.
Options
Description
For barcoded samples, select a barcode.
(Required)
Select a sample that is a part of the selected sample set or sets.
Click the Control Type column heading to expand the column, then select the control type from the dropdown list.
(Optional) Review sample ID information for each sample. To edit Sample ID, you must edit the Sample Set as described in Edit a Sample Set.
(Optional) Review sample description for each sample. To modify Sample Description, you must edit the Sample Set as described in Edit a Sample Set.
For DNA and fusions application, select DNA or Fusions for each sample.
If using different reference and BED files for one or more samples, click the Reference column heading to expand the sections, then select reference, target regions, and hotspots files for each sample.
Click the Annotations column heading to expand the annotations specific for your application (for example, cancer type or embryo ID), then complete the required information.
Select the Ion Reporter™ Software analysis workflow specific for your run. If you do not see your analysis workflow, select the Show All Worklows checkbox in the column heading.
Select sample relationship group.
Set the IR Set ID to the same value for related samples. After file transfer, in Ion Reporter™ Software, samples with the same IR Set ID are considered related samples and are launched in the same analysis (for example, normal sample and its corresponding tumor sample). Do not give unrelated samples the same IR Set ID value even if the value is zero or blank.
-
-
Click Next to continue the steps to create the Planned Run.
The software takes you to the next step in the workflow bar. For more information, see Steps in the workflow bar.
- Click Save & Finish.