Archive or delete data automatically
To avoid data loss, it is critical that sufficient disk space is available on the Ion Torrent™ Server. Therefore, it is important to have a strategy to monitor disk space and archive or delete data if needed.
An administrator can configure the Ion Torrent™ Server to archive data to a mounted drive automatically after a data age threshold is met. Data that is assigned to be automatically archived are copied to the designated location, then deleted from the Ion Torrent™ Server. Automatic archiving helps to maintain available disk space, and simplifies management of data that you want to save to another volume.
An administrator can also configure the Ion Torrent™ Server to delete data automatically when thresholds are met for filled disk space and data age. Automatic deletion of files is important to maintain available disk space, and simplifies removal of data that are no longer necessary to keep.
An administrator can also assign automated archive or delete actions to each data file category independently of the others.
- In the Data tab, click Data Management, go the Configuration section, then click Configure.
-
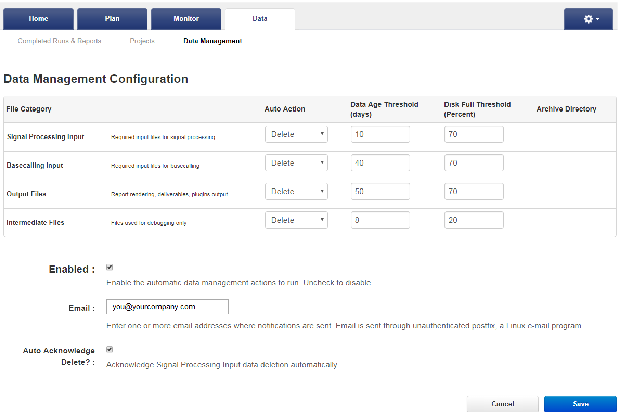
On the Data Management Configuration screen, select an auto-action, or select Disabled for each file category, then configure:
If you select this auto action
Select these options:
Disabled
No selections are necessary—data in the file category must be archived or deleted manually.
Archive
Delete
- Select the Enabled checkbox to enable the automatic data management you have configured. Deselect the checkbox to suspend automatic action.
-
In Email, enter an email address of where to receive notifications for automatic data management actions.
If you use a Linux™ mail server, you might have access to Postfix, an open-source Linux™ mail server. Postfix has many configuration options that IT administrators can use to adjust mail routing parameters. You can find Postfix documentation at http://www.postfix.org/documentation.html.
-
(Optional) To enable auto-acknowledgement of deletion of signal processing input data, select the Auto Acknowledge Delete? checkbox. Action is not required for data deletion to occur.
If you deselect Auto Acknowledge Delete, notifications are sent for each signal processing input deletion. A reviewer must manually acknowledge each deletion action before the signal processing input data are deleted.
- After you have completed the configuration, click Save.
- (Optional) On the Data Management screen, click Configuration Log in the Configuration section to view a record of configuration changes.
- (Optional) To view a record of data management actions (archiving and deleting), click History.